Why Your Headlights Need Attention Now
Headlight repair is the process of restoring cloudy, yellowed lenses to their original clarity. A typical DIY repair takes 1-2 hours and costs $20-50, while professional replacement can cost $200-1,000.
Quick Answer: How to Repair Headlights
- Wash and tape – Clean the lens and mask surrounding paint.
- Wet sand – Use 800, 1500, then 2000-grit sandpaper with water.
- Polish – Apply rubbing compound until the lens is clear.
- Seal – Apply a UV-resistant clear coat for protection.
If your vehicle is over three years old, its headlights are likely yellowing. This is a major safety concern. The IIHS reports that vehicles with good headlight ratings have 19% fewer single-nighttime crashes and 23% fewer pedestrian crashes.
The cause is UV radiation and oxidation breaking down the polycarbonate plastic used in modern headlights. This plastic saves weight but requires maintenance.
Restoring your headlights can improve light output by up to 525% and visibility by 60 meters for a fraction of the replacement cost. It’s a cost-effective DIY project that improves safety, appearance, and helps you pass vehicle inspections.
This guide covers the entire process, from understanding the cause to applying a long-lasting protective coat.

Why Clear Headlights Matter: Causes, Safety, and Solutions
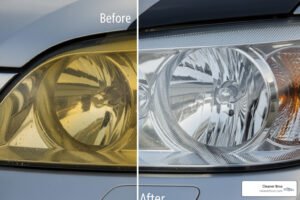
If your headlights look cloudy or yellow, it’s more than a cosmetic issue—it’s a significant safety concern. Foggy headlights reduce your ability to see and be seen on the road, making nighttime driving more dangerous.

What Causes Headlights to Become Cloudy or Yellow?
The biggest enemy of your headlights is sunshine. Modern headlight lenses are made from lightweight, shatter-resistant polycarbonate plastic. However, this material is vulnerable to sun damage.
- UV Radiation: The sun’s ultraviolet rays break down the factory protective coating on the lens.
- Oxidation: Once the coating fails, the exposed polycarbonate reacts with oxygen and UV light, creating the yellow, hazy film you see.
- Road Debris: Tiny particles of sand, dirt, and salt create microscopic scratches that scatter light and make the lens look cloudy.
- Chemical Contaminants: Acid rain, harsh car wash chemicals, and exhaust fumes accelerate the breakdown of the plastic and its coating.
Manufacturers use plastic lenses to reduce vehicle weight and improve fuel economy, making headlight repair a regular part of vehicle maintenance.
The Dangers of Dim Headlights
Cloudy headlights are a genuine safety hazard. The hazy film blocks light, cutting your effective light output by more than half and severely reducing your night driving visibility. Restoring headlights can improve illumination by up to 525%.
This improved light output helps you see hazards, pedestrians, and wildlife much sooner. Cloudy lenses also distort the beam pattern, making even new bulbs ineffective. This reduced visibility directly impacts your reaction time. Restored headlights can increase your response time by 4 seconds when traveling at 50 km/h—the difference between a safe stop and a collision at highway speeds.
Research from the Insurance Institute of Highway Safety (IIHS) shows that vehicles with good headlight ratings have a 19% reduction in single-nighttime crashes and a 23% reduction in pedestrian crashes. These numbers represent real lives saved.
Dim headlights also make your vehicle look neglected. For tips on keeping your car looking its best, see our guide on overall vehicle appearance.
Why Restore Your Headlights?
Headlight restoration is both the smart financial choice and the safer choice. Replacing a headlight assembly costs $200 to $1,000+ per light, plus labor. In contrast, a DIY headlight repair kit is only $20-$50, and professional restoration is typically under $100. The cost savings are substantial.
The most important benefit is improved safety. Clearer vision and faster reaction times at night are invaluable. As a bonus, the improved appearance can take years off your vehicle’s look and increase its resale value.
Restoration is perfect for lenses that are yellowed, hazy, or have light surface scratches. However, it isn’t always the answer. If lenses are cracked, mounting tabs are broken, or there’s internal moisture from failed seals, the entire assembly needs replacement. Polishing cannot fix structural damage.
Your Step-by-Step DIY Headlight Repair Guide
A DIY headlight repair is a satisfying project that delivers better visibility, a sharper-looking car, and significant savings. The process takes about 1-2 hours and is achievable even for beginners. We’ll walk you through every step.

What Materials Are Needed for DIY Headlight Repair?
Gathering your supplies first makes the job go smoothly. You will need:
- Automotive masking tape (blue painter’s tape works well) to protect your car’s paint.
- Assorted grit wet/dry sandpaper: Typically 800, 1500, and 2000 grit. Coarser grits (400-600) may be needed for heavy oxidation.
- Polishing compound designed for automotive use.
- UV-resistant clear coat or sealant: This is the most important item for long-lasting results. A 1:1 mix of Minwax Helmsman Spar Urethane and mineral spirits is a popular DIY option.
- Microfiber towels for cleaning and buffing.
- Spray bottle with water (add a drop of soap for lubrication).
- Rubbing alcohol for final cleaning.
- Optional: A cordless drill with a polishing pad attachment to speed up polishing.
Step 1: Preparation and Cleaning
Proper preparation is key to success. First, wash the headlights thoroughly with car soap and water to remove all dirt and grime. Rinse and dry the lens completely with a microfiber towel.
Next, protect your paint. Apply several layers of automotive masking tape around the entire headlight. A wide border is crucial to prevent accidentally sanding your car’s finish. Take your time with this step.

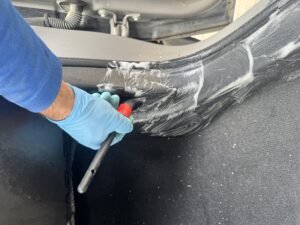
Step 2: Wet Sanding the Oxidation
Wet sanding removes the yellowed, oxidized layer. It may seem counterintuitive to scratch the lens, but this is a necessary step.
Start with your coarsest sandpaper (e.g., 800-grit). Always wet sand: keep the lens and sandpaper wet with a spray bottle. This lubricates the surface, prevents clogging, and washes away removed material. Sand horizontally across the entire lens with firm, even pressure. A milky residue indicates you are removing the oxidized plastic.
Once the lens is uniformly hazy, rinse it and switch to the next finer grit (e.g., 1500-grit). Alternate sanding direction with each grit (e.g., sand vertically with 1500-grit). This cross-hatching pattern helps remove the previous grit’s deeper scratches.
Finally, move to your finest grit (e.g., 2000-grit) and sand in a consistent direction. After this step, the headlight should have a smooth, uniform, matte haze. Rinse and dry the lens to inspect your work. If you see any shiny spots, re-sand that area.
Note: Moisture inside the headlight indicates a broken seal, a separate issue not fixed by this process. You can learn about cleaning inside the lens, but it often requires professional repair.
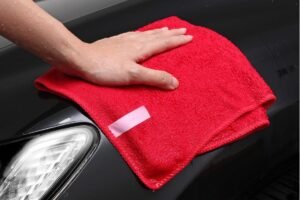
Step 3: Polishing to a Crystal Clear Finish
Polishing removes the fine scratches from sanding, restoring clarity. Apply a small amount of polishing compound to the lens or a polishing pad.
If using a drill, start on low speed to spread the compound, then increase speed. Work in small sections with steady, moderate pressure. If polishing by hand, use a microfiber towel and work the compound in with firm, circular motions. This requires more effort but is equally effective.
Continue polishing until the lens becomes clear and shiny. Wipe away all excess compound with a clean microfiber towel and inspect for any remaining haze or swirl marks. Re-polish any dull spots as needed. This is similar to professional paint correction, which you can learn more about with our scratch removal and paint buffing services.
Step 4: Applying a UV Protective Sealant
This is the most critical step for long-lasting results. Without a UV sealant, your headlights will yellow again in months. Do not skip this.
First, clean the lens thoroughly with rubbing alcohol on a microfiber towel to remove all oils and residue. Let it air dry completely.
Apply the UV sealant according to the product’s instructions. Use a foam applicator or spray a thin, even coat, being careful to avoid drips. If a drip occurs, wipe it immediately before it dries.
Patience is key. Let the sealant cure completely as per the product instructions. Avoid touching it or getting it wet during this time, which can range from 30 minutes to several hours. This clear coat acts as armor against the sun, protecting the polycarbonate and keeping your headlights clear for 1-3 years.
Aftercare, Longevity, and Common Pitfalls
You’ve done it! Your headlights are sparkling clear, and you’re probably feeling pretty proud of yourself. But like any good project, the real test is how well your work holds up over time. Let’s talk about keeping those headlights crystal clear and avoiding the common mistakes that can undo all your hard work.

How Long Does Headlight Restoration Last?
A DIY headlight repair is not permanent, but it can last one to three years with proper care. The longevity depends heavily on the quality of the UV sealant and environmental factors. A high-quality sealant is essential for durable results.
Your results will last longer if the car is garage-parked or frequently in the shade. Constant, direct sun exposure will break down the protective coating more quickly.
How to Prevent Future Clouding
A few simple habits can prevent future clouding and extend the life of your restoration:
- Regular Washing: Clean your headlights when you wash your car to remove contaminants before they can cause damage.
- Apply Car Wax or Sealant: When waxing your car, apply a layer to your headlights. Many waxes contain UV inhibitors that add extra protection.
- Park in Shade or a Garage: This is the most effective way to prevent UV damage. Less sun exposure means a longer-lasting restoration.
For more tips on maintaining your vehicle, see our guide on Tips for eco-friendly car care.
Potential Risks of DIY Headlight Repair
While DIY headlight repair is straightforward, be aware of these potential pitfalls:
- Damaging Car Paint: This is the most common mistake. Always use plenty of automotive tape to create a wide, protective border around the headlight. Sandpaper will ruin your car’s paint finish on contact.
- Uneven Sanding Results: Rushing the sanding step can leave hazy or blotchy spots. Work slowly and methodically, ensuring you cover the entire lens evenly with each grit.
- Improper Sealant Application: Applying sealant too thickly can cause drips and streaks. Not allowing it to cure fully will lead to premature failure. Follow the product instructions carefully.
- Avoid Internet “Hacks”: Never use bug spray on your headlights. The harsh chemicals (like DEET) will permanently damage the polycarbonate plastic, making the yellowing worse and harming your car’s paint. See why bug spray is a bad idea and stick to products designed for restoration.
Frequently Asked Questions about Headlight Restoration
Here are answers to the most common questions about headlight repair and restoration.
Can I just use toothpaste to clean my headlights?
The popular toothpaste trick offers a temporary fix. The mild abrasives in toothpaste can buff away some surface oxidation, making headlights look clearer for a short time. However, it’s a temporary solution because toothpaste provides no UV protection. Without a sealant, the haze and yellowing will return within a few weeks or months. For lasting results, use a dedicated restoration kit with a UV sealant.
When is it necessary to seek professional headlight restoration?
While DIY is great for most cloudy or yellowed headlights, some situations require professional help or full replacement:
- Deep cracks allowing moisture: This indicates a failed seal and requires replacement to prevent electrical issues.
- Broken mounting tabs: If the headlight is no longer securely attached to the vehicle, it needs to be repaired or replaced for proper alignment and safety.
- Severe internal damage or fogging: If the cloudiness is on the inside of the lens, the seal has likely failed. This is a complex repair that often requires replacement. You can Learn about cleaning inside the lens, but it’s not a simple task.
- Failed LED or HID components: On many modern cars, the bulbs are integrated into the headlight assembly and cannot be replaced separately. If the light source fails, the entire unit must be replaced.
How much does professional headlight restoration cost?
Professional headlight repair is significantly cheaper than replacement, often saving you hundreds of dollars. Most services charge between $50 and $150 for both headlights, depending on the vehicle and severity of the damage.
Professionals use higher-grade materials and sealants than most DIY kits, offering more durable, longer-lasting results. Their experience ensures a perfect, streak-free finish every time.
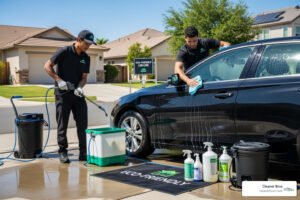
Many services also offer mobile convenience, coming to your home or office. At Cleaner Bros, we bring our professional equipment and expertise to you throughout Utah County, including Orem, Spanish Fork, and Provo. We offer transparent pricing and a convenient Headlight Restoration Utah County service, restoring your headlights while you go about your day.
Conclusion: Enjoy Safer, Brighter Nights
Restoring your headlights is a satisfying project that offers both immediate visual and safety improvements. Your vehicle looks younger, and more importantly, you’ve made your nighttime driving significantly safer.
A proper headlight repair can increase light output by up to 525%, add 60 meters of visibility, and give you 4 more seconds of reaction time. These improvements are critical for spotting hazards like deer or pedestrians at night.
This DIY project is accessible to most car owners, requiring only an afternoon and $20-50 in materials. You can save hundreds over replacement and gain the satisfaction of doing it yourself.
Of course, if you prefer the peace of mind that comes with a professional, guaranteed result, we’re here to help. If you’re in Utah County, the team at Cleaner Bros offers a convenient Headlight Restoration Utah County service that comes right to your home or office in Orem, Spanish Fork, Provo, and the surrounding areas. We’ll handle everything, leaving you with crystal-clear, factory-fresh headlights.
Whether you do it yourself or let us handle it, restoring your headlights is a smart, cost-effective choice. Here’s to brighter, safer nights ahead!