Why Clear Headlights Are Critical for Your Safety
Oxidized headlight restoration is the process of removing the cloudy, yellowed film from headlight lenses to restore clarity and improve light output. If your headlights are foggy, restoration can dramatically improve visibility and safety in just 1-2 hours.
Quick Answer: How to Restore Oxidized Headlights
- Clean the headlight to remove surface dirt.
- Mask the surrounding paint with automotive tape.
- Wet sand the lens with progressively finer sandpaper (800 to 3000 grit).
- Polish with a compound to restore clarity.
- Seal with a UV protective coating to prevent future oxidation.
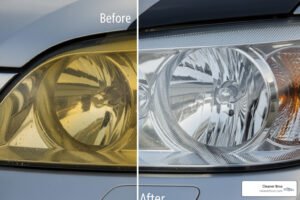
Foggy, yellowed headlights are a common problem, especially on older vehicles. This oxidation can reduce light output by up to 50%, making nighttime driving dangerous. In Utah, intense sun exposure accelerates the breakdown of plastic headlight lenses, making this issue particularly prevalent.
The good news is that restoration can save you hundreds of dollars compared to replacement, and the process is more straightforward than you might think. Understanding how to fix oxidation will help you make the right choice for your vehicle and your safety.

Why Headlights Turn Yellow and Why It’s a Safety Hazard
Your headlights left the factory crystal clear, but over time, they can turn yellow and cloudy. This process, known as oxidation, is a safety concern that requires oxidized headlight restoration.
What Causes Headlight Oxidation?
Modern headlights are made from polycarbonate plastic, protected by a factory-applied UV clear coat. This protective layer breaks down over time due to several factors:
- UV Radiation: The sun is the primary cause. UV rays cause photodegradation, a process that makes the plastic brittle, porous, and discolored. This effect is accelerated by Utah’s 200+ sunny days per year.
- Road Debris: Sand, dust, and pebbles create microscopic scratches on the lens surface, making it more vulnerable to damage.
- Chemical Exposure: Pollutants, acid rain, and harsh car wash soaps eat away at the protective coating.
Once the clear coat fails, the exposed polycarbonate oxidizes, creating the yellow haze that blocks light.
How Oxidized Headlights Compromise Road Safety
Foggy headlights are a serious safety hazard, not just a cosmetic issue. Oxidized lenses scatter and block light, which can reduce light output by up to 50%. According to a study by AAA, even new headlights can underperform, so a 50% reduction in visibility is a major risk. This means you have less time to react to hazards, pedestrians, or animals on the road, especially at night or in bad weather like rain and fog.
Dim headlights also make your vehicle less visible to other drivers and pedestrians, increasing the risk of an accident. For anyone driving on unlit roads in Utah County, clear headlights are essential. Fortunately, oxidized headlight restoration can restore visibility and safety without the high cost of replacement.
The Complete Guide to Oxidized Headlight Restoration
You don’t need to spend hundreds on new headlight assemblies to fix foggy lenses. Oxidized headlight restoration is a cost-effective alternative that can restore clarity in just 1-2 hours. The process involves wet sanding to remove the damaged layer, polishing to restore transparency, and sealing to protect against future oxidation.
Tools and Materials You’ll Need
Gather these materials before you begin your oxidized headlight restoration project.

- Automotive masking tape: To protect the paint around the headlights.
- Wet/dry sandpaper: Assorted grits, such as 800, 1500, and 3000.
- Spray bottle with water: To keep the surface lubricated during sanding.
- Microfiber towels: For cleaning, drying, and buffing.
- Polishing compound: An automotive plastic polish is required.
- Cordless drill with foam polishing pads: Optional but highly recommended for easier polishing.
- Isopropyl alcohol: To clean the lens before sealing.
- UV protective sealant: A crucial final step to prevent re-oxidation.
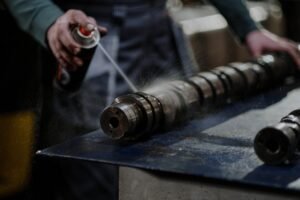
Step-by-Step Oxidized Headlight Restoration Process
Follow these steps to restore your headlights.
Step 1: Cleaning
Wash the headlights thoroughly with car soap and water to remove all surface dirt and grime. Rinse and dry with a microfiber towel.
Step 2: Masking
Apply automotive masking tape around the perimeter of each headlight to protect your vehicle’s paint.

Step 3: Wet Sanding
This step removes the oxidized layer.
- Start with 800-grit sandpaper. Spray the headlight and sandpaper with water. Sand with back-and-forth motions, keeping the surface wet. A milky, yellowish residue will appear as the oxidation is removed. Continue until the lens has a uniform, hazy finish.
- Move to 1500-grit sandpaper and repeat the process to remove the scratches from the previous step.
- Finish with 3000-grit sandpaper to create a smooth surface for polishing. The lens will still look hazy. Rinse and dry completely.
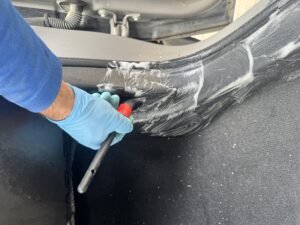
Step 4: Polishing
This step restores clarity.
- Apply a small amount of polishing compound to a foam pad. If using a drill, work at a low-to-medium speed, keeping the pad moving to avoid heat buildup.
- Polish until the haze is gone and the lens is clear. If polishing by hand, use firm, circular motions.
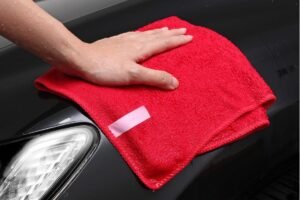
- Wipe away excess compound with a clean microfiber towel.

If you have deeper scratches that polishing can’t remove, our team offers professional scratch removal and paint buffing services in Utah to handle tougher imperfections.
Step 5: Protecting
This is the most critical step for long-lasting results.
- Wipe the headlights with isopropyl alcohol to remove any oils and let it evaporate.
- Apply your UV protective sealant according to the product’s instructions. Apply a thin, even coat and allow it to cure fully. This new layer acts as a shield against future UV damage and oxidation. Do not skip this step.
DIY vs. Professional Restoration: Which is Right for You?
Deciding between a DIY project and professional oxidized headlight restoration depends on your budget, time, and desired outcome. While DIY can be satisfying and affordable, professional service offers guaranteed, long-lasting results.
Pros and Cons of DIY Restoration
The main appeals of DIY restoration are affordability and the sense of accomplishment. A basic kit costs around $15 to $30, and the project takes about 1-2 hours.
However, DIY results can be inconsistent. The biggest drawback is often a shorter lifespan; without a high-quality UV sealant, oxidation can return in just 6 to 12 months. There’s also a risk of creating new scratches or damaging the surrounding paint if the technique isn’t correct. For those who enjoy hands-on projects and have only mild oxidation, DIY can be a good option, provided you use a quality sealant.
When to Call a Professional
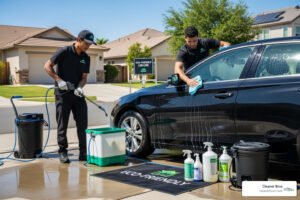
For severely oxidized, yellowed, or pitted headlights, a professional has the specialized equipment and experience to achieve the best results. It’s also the ideal choice if you lack the time or simply want the job done right without the hassle. With a mobile service like ours, we come to you, saving you time.
The key advantage of professional service is longevity and guaranteed results. We use industrial-grade sealants that protect headlights for 1 to 3 years or more, and our work is often warrantied. Professional restoration costs around $150, which is significantly cheaper than replacing the entire headlight assembly. The investment ensures a durable, factory-like finish.
If you want to ensure your entire vehicle looks its best, our exterior detailing services in Utah can provide a complete makeover.
| Feature | DIY Restoration | Professional Restoration |
|---|---|---|
| Cost | $15 – $30 (for materials) | ~$150 (varies by service/location) |
| Time Investment | 1-2 hours of your time | 1-2 hours (done by technician) |
| Skill Level | Moderate (requires patience and technique) | Expert (trained professionals) |
| Longevity | 6 months – 1 year (depends on sealant quality) | 1-3 years or more (professional-grade protection) |
| Results | Variable, best for mild oxidation | Consistent, high-quality, handles severe cases |
| Equipment | Basic hand tools, optional drill | Specialized professional-grade equipment |
| Warranty/Guarantee | Rarely included | Often offered for peace of mind |
Both paths lead to clearer headlights. DIY is great for budget-conscious enthusiasts, while professional restoration is for those who want guaranteed, long-lasting results with minimal effort.
Maintaining Brilliance: How to Prevent Future Headlight Oxidation
After restoring your headlights, proper maintenance is key to preventing oxidation from returning. A few simple, consistent habits will keep your headlights clear for years.
Apply a UV Protective Sealant
This is the most critical step in preventing re-oxidation. The original factory UV coating is gone, so you must replace it with a new protective layer.
Dedicated headlight sealants and ceramic coatings create a durable barrier against UV rays, climate changes, and road chemicals. For optimal protection, plan to reapply a UV sealant every 6-12 months. The frequency depends on sun exposure and climate, but regular application is essential for long-term clarity.
Adopt a Regular Cleaning Routine
Regularly cleaning your headlights removes dirt, grime, and chemicals that can wear down the protective sealant.
Hand wash your headlights with a pH-neutral car soap and a soft microfiber cloth. Avoid harsh chemicals or abrasive brushes, as they can strip the sealant and create fine scratches that accelerate oxidation. Gentle, consistent cleaning is far more effective than occasional, aggressive scrubbing.
Park Smart
Where you park your car significantly impacts how long your restoration lasts.
- Garage Parking: The best option is to park in a garage to shield your headlights from direct sun exposure.
- Car Cover: If a garage isn’t available, a breathable car cover offers excellent protection from UV rays and other environmental contaminants.
- Shade: At a minimum, try to park in the shade whenever possible, especially during peak sun hours (10 a.m. to 4 p.m.).
Protecting your headlights from Utah’s intense sun is similar to protecting your car’s paint. For more comprehensive strategies, see our guides on 3 Ways to Protect Your Car Paint and How to Protect Your Car During a Summer Heat Wave.
By sealing regularly, washing gently, and parking smart, you can maintain brilliant, clear headlights for years to come.
Frequently Asked Questions about Headlight Restoration
Here are answers to some of the most common questions we receive about oxidized headlight restoration.
Do household products like toothpaste or WD-40 really work?
The short answer is no, not for long-term results.
- Toothpaste: Its abrasives can slightly buff the surface, offering a temporary improvement. However, it provides no UV protection, so the oxidation quickly returns, often worse than before. It can also create fine scratches.
- WD-40: This product creates an oily film that fills in scratches, giving the illusion of clarity. It doesn’t remove oxidation, and the effect washes away with the first rain or car wash, leaving a residue that attracts dirt.
These household hacks don’t address the root cause—UV degradation—and can’t replace the protective clear coat. For lasting results, proper automotive restoration products or professional services are necessary.
How long does headlight restoration last?
The longevity of a restoration depends on the quality of the UV sealant and your maintenance routine.
- DIY Restoration: Using a basic kit, you can expect results to last 6 months to a year. The outcome is highly dependent on the quality of the sealant used.
- Professional Restoration: Using high-quality, automotive-grade clear coats or ceramic coatings, a professional job can last 1 to 3 years or even longer.
Regular maintenance, such as reapplying a sealant every 6-12 months and parking in the shade, will dramatically extend the life of your restoration, especially in a sunny climate like Utah’s.
When are headlights beyond restoration and need replacement?
While oxidized headlight restoration is highly effective, some headlights are too damaged to be saved. Replacement is necessary in these cases:
- Deep internal cracks or crazing: Spider-web-like patterns inside the lens indicate structural failure of the plastic that cannot be polished out.
- Moisture sealed inside: If condensation is permanently trapped in the housing, the seal has failed, which can lead to electrical issues. Restoration only treats the outer lens.
- Severe pitting or deep gouges: If the damage is too deep, sanding it out could compromise the lens’s integrity.
- Extremely brittle or discolored plastic: If the entire lens is degraded through and through, it has reached the end of its life.
If you’re unsure, we can provide an honest assessment to determine if restoration is a safe and viable option for your vehicle.
Restore Your Headlights for a Safer, Cleaner Ride
We’ve covered the why, how, and what-comes-next of oxidized headlight restoration. It’s a car care task that delivers a dramatic improvement in both appearance and safety.
Restoring your headlights isn’t just cosmetic; it’s about safety. Projecting up to 50% more light onto the road gives you more time to react to hazards. It’s also a great value, saving you hundreds of dollars over replacement while boosting your car’s resale value. Cloudy headlights can make an otherwise well-maintained vehicle look neglected.
Whether you choose a DIY project or professional service, taking action is what’s important. Your headlights are critical for safe driving, and they deserve proper care.
If you’re in Utah County and want professional-grade results with long-lasting protection, Cleaner Bros is here to help. We are a mobile service that comes to your home or office in Orem and across northern Utah County. We use professional techniques and eco-friendly products to ensure your headlights stay crystal clear for years, not months.
Ready to see the difference? Book your professional headlight restoration service today! A safer, cleaner ride is just a click away.