Why Clear Headlights Are Essential for Safe Driving
Head light restoration is the process of removing oxidation and yellowing from your vehicle’s headlight lenses to restore clarity and improve visibility. If your headlights look cloudy, hazy, or yellow, you can restore them yourself in 2-3 hours using sandpaper, polish, and a UV sealant—or opt for professional service for guaranteed results.
Quick Answer: The 5-Step Restoration Process
- Clean and tape – Wash the headlight and mask surrounding paint
- Wet sand – Use progressively finer grits (800 to 3000) to remove oxidation
- Clean – Wipe away residue with rubbing alcohol
- Polish – Apply compound to restore clarity
- Seal – Apply UV sealant to prevent future yellowing
Headlights begin to fade over time, and there’s no way around it. As your headlights fade, the amount of light that makes it out of the headlight becomes less, and before you know it, driving at night becomes difficult—but more importantly, dangerous.
The good news? You don’t need to replace your entire headlight assembly. Most cloudy, yellowed headlights can be restored to nearly new condition with the right technique and materials.
Why this matters for Utah drivers: The intense UV rays and harsh environmental conditions in Utah accelerate headlight degradation. Road salt in winter and dust year-round compound the problem, making regular headlight maintenance especially important for local vehicle owners.
This guide will walk you through the complete restoration process, from understanding what causes the yellowing to maintaining your results for months to come.

Why Do Headlights Turn Yellow and Cloudy?
Ever notice how your headlights go from crystal-clear to looking like they’ve been coated in old honey? It’s not your imagination, and you’re definitely not alone. Understanding what causes this cloudy, yellowed appearance is the first step toward successful head light restoration.
Here’s what’s happening to your headlights: Modern headlight lenses are made from polycarbonate plastic rather than glass. Manufacturers chose this material because it’s incredibly durable and won’t shatter on impact—a huge safety win. When your car rolls off the factory floor, these plastic lenses come with a thin UV protective film coating the surface, acting like invisible sunscreen to shield them from the sun’s harsh rays.
The problem? That protective coating doesn’t last forever.
As months and years pass, the UV protective film gradually breaks down and wears away. Once it’s gone, the polycarbonate plastic underneath is exposed directly to UV rays from sunlight. This triggers an oxidation process—essentially a chemical reaction where the sun’s ultraviolet light damages the surface layer of the plastic itself.
You’ll start seeing the effects pretty quickly once oxidation takes hold. The lens develops a hazy appearance, often accompanied by yellowing discoloration that makes your headlights look decades older than they are. And here’s the thing: this isn’t just about looks.
That cloudy, oxidized layer dramatically reduces light output from your bulbs. The degraded plastic scatters and blocks the light that should be illuminating the road ahead, creating a genuine safety hazard when you’re driving at night. You can’t see as well, and other drivers have a harder time seeing you.
Environmental elements don’t help matters either. Road debris constantly pelts your headlights, creating microscopic scratches. Harsh chemicals from road salt, bug splatter, and even some car wash products accelerate the breakdown. If you’re driving in Utah, the intense high-altitude UV exposure and seasonal road salt make this problem even worse.
The good news? While oxidation and yellowing are inevitable, they’re completely reversible with proper head light restoration techniques. You don’t need to replace the entire headlight assembly—you just need to remove that damaged outer layer and protect what’s underneath.
Your Complete Guide to DIY Head Light Restoration
Ready to roll up your sleeves and bring those cloudy headlights back to life? You’re in the right place. This section walks you through our proven DIY method for head light restoration, with clear, step-by-step instructions that anyone can follow. No fancy mechanic skills required—just a little patience and the right approach.
Key Supplies for Your DIY head light restoration
Before we get started, let’s talk supplies. Having everything on hand before you begin makes the whole process smoother and keeps you from running to the auto parts store mid-project.

The foundation of this restoration method is wet/dry sandpaper in various grits. You’ll need a progression from coarser to very fine—typically 800, 1000, 2000, and 3000 grit. If your headlights look like they’ve been through a sandstorm, you might start with 320 or 600 grit. These packs usually run about $3-$5 each at your local auto parts store.
Next up is polishing compound. An automotive polishing compound or dedicated plastic polish works beautifully here. This is what transforms your hazy, sanded headlight back into a clear lens.
You’ll also need blue painter’s tape to protect your car’s paint around the headlight. Trust us on this one—blue painter’s tape holds up better when wet compared to standard masking tape, and you’ll be using a lot of water.
Grab several microfiber towels for cleaning, buffing, and applying products throughout the process. A spray bottle filled with water is essential for keeping everything wet during sanding. Pro tip: add a few drops of car soap to the water for better lubrication.
Before you apply anything, you’ll want rubbing alcohol for a final cleaning step. And here’s the most important item for long-lasting results: UV sealant. You can use a dedicated headlight UV sealant, or mix Minwax Helmsman Spar Urethane (the clear gloss version with the red label) with odorless mineral spirits in a 1:1 ratio.
While it’s optional, a drill with a compound or wool pad attachment makes the polishing step significantly easier and more effective. Your arms will thank you. Finally, keep some shop towels or a sponge brush handy for applying the UV sealant evenly without streaks.
With these supplies gathered, you’re ready to transform those headlights from foggy to fantastic.
The 5-Step Sandpaper & Polish Method
This is where the magic happens. We’re breaking down the complete head light restoration process into five straightforward steps that deliver lasting results. Plan on spending about 2 to 3 hours total, with the actual sanding taking around 15 to 30 minutes depending on how oxidized your headlights are.
1. Preparation: Clean and Tape
Every good restoration starts with a clean surface. Wash your headlights thoroughly with car soap and warm water, removing all the surface dirt, grime, and loose debris that’s accumulated. Rinse them well and dry completely with a clean microfiber towel.
Now comes a step you absolutely cannot skip: masking off the surrounding paint and trim with tape. Take your blue painter’s tape and carefully create a protective border around the entire headlight. We’re about to do some serious sanding, and the last thing you want is accidentally scuffing your car’s finish. Think of it as creating a safe work zone where only the headlight gets the treatment.
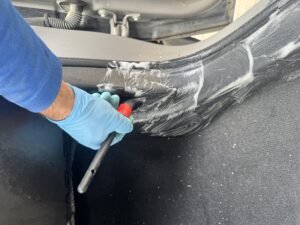
2. Wet Sanding: Removing the Oxidation
Here’s where you’ll see real change begin. Wet sanding removes those degraded, oxidized layers of plastic to reveal the clear material underneath.

Start with your coarsest grit—800 or 1000 depending on how bad the yellowing is. Cut your sandpaper into manageable pieces that fit comfortably in your hand. Now here’s the key: keep everything wet. Continuously spray water onto both the headlight and the sandpaper. This isn’t just called wet sanding for fun—the water prevents clogging and ensures smooth, effective abrasion.
Begin sanding in horizontal strokes for about 5 to 10 minutes, covering the entire lens evenly. You’ll notice a milky, yellowish runoff. Don’t worry—that’s exactly what you want to see. That’s the oxidized plastic washing away.
After those first 5 to 10 minutes, wipe off the residue and switch to the next finer grit. This time, change your direction to diagonal strokes for another 5 to 10 minutes. Continue this pattern with each progressively finer grit—2000, then 3000—alternating your sanding direction each time. Maybe go opposite diagonal, then back to horizontal for the finest grit.
Spend a bit more time with the finer grits to ensure you’ve removed all the scratches from the coarser sandpaper. When you’re done, the headlight should have a uniform, hazy-but-smooth finish that feels perfectly smooth when you run your hand across it.
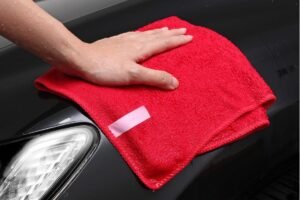
3. Cleaning and Drying: Prepping for Polish
Your headlights probably look uniformly cloudy right now. If you’re feeling a moment of panic, take a breath—this is exactly what they should look like at this stage.
Wipe away all the sanding residue with a clean, damp microfiber towel. Get every bit of that milky residue off the surface. Then clean the lens with rubbing alcohol to remove any remaining oils or contaminants. This creates the ideal surface for polishing and sealing.
Make sure the lens is completely dry before moving forward. Let it air dry, or carefully dry it with a clean, dry microfiber towel. Any lingering moisture will interfere with the next steps and compromise your results.
4. Polishing: Bringing Back the Shine
This is the satisfying part where clarity returns and your hard work pays off. Polishing removes those fine scratches left by sanding and brings back that crystal-clear shine.
Apply a small amount of polishing compound to either a microfiber applicator pad or directly to your drill’s polishing pad. If you’re using a drill, spread the compound over the headlight lens first without turning it on. Then start polishing at low speed, gradually increasing as you work in overlapping passes across the entire lens.
If you’re polishing by hand, use firm circular motions with steady pressure. Watch the haze disappear and the clarity return—it’s genuinely rewarding to see. Continue until the lens is clear and shiny, then wipe off any excess compound with a clean microfiber towel.
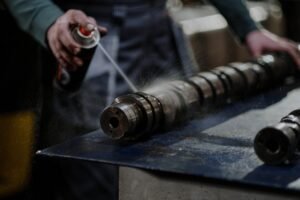
5. Sealing: Protecting Your Hard Work
Here’s the truth: if you skip this step, all that work you just did will only last a few months. The UV sealant is absolutely critical for long-lasting results. It creates a protective barrier against future UV damage and oxidation, keeping your headlights clear for years instead of months.
Whether you’re using a dedicated headlight sealant or the urethane mixture we mentioned earlier (Minwax Helmsman Spar Urethane mixed 1:1 with odorless mineral spirits), apply it carefully and thoughtfully. Dip a sponge brush or folded shop towel into the sealant, removing any excess to prevent drips.
Apply thin, even coats horizontally across the entire headlight lens. Use that painter’s tape as your guide for clean edges. The key word here is thin—over-applying leads to streaks or that dreaded “orange peel” texture. This protective UV coat is what prevents your headlights from turning yellow or hazy again.
Let the sealant dry for at least 30 minutes before driving, but ideally give it overnight to cure properly. Full curing takes a few days, so hold off on washing your car for about three days to let everything set completely.
Want to see this entire process in action with professional tips? Check out this video on permanent headlight restoration using clear coat.
The Finishing Touches: Sealing and Maintenance
You’ve done the hard work, and your headlights are looking incredible! But here’s the thing—restoration without proper protection is like washing your car before a rainstorm. Let’s talk about how to lock in those results and keep your headlights crystal-clear for the long haul.
The Critical Role of UV Sealant in head light restoration

So what exactly is UV sealant? Think of it as a clear, protective shield for your headlights. It’s a specialized coating that creates a barrier between your freshly restored polycarbonate lens and all the nasty environmental factors that caused the yellowing in the first place.
Here’s why it matters so much: Remember how we talked about that factory UV protective film wearing away? Well, when you sand down your headlights during restoration, you’re removing what’s left of that protection. Without applying a new protective layer, you’re leaving bare polycarbonate plastic exposed to the same UV rays and oxidation that created the problem originally. And trust us, that yellowing will come back faster than you’d think—often within just a few months.
The right sealant prevents re-oxidation by blocking the chemical reaction that causes that hazy, yellow appearance. It actively blocks harmful UV rays from penetrating the plastic surface, which is the root cause of headlight degradation. This is especially critical here in Utah, where our intense sun and high altitude mean extra UV exposure year-round.
Without proper UV protection, even the most meticulous restoration becomes a temporary fix. But with the right sealant, you’re looking at results that can last a year or more. That’s the difference between a weekend project you’ll need to repeat in a few months and one that genuinely solves the problem.
Just like you’d protect your car’s paint from the elements, your headlights deserve that same level of care. If you’re interested in comprehensive protection for your entire vehicle, check out our guide on 3 Ways to Protect Your Car Paint.
How to Maintain Your Restored Headlights
Your headlights are restored and sealed—congratulations! Now let’s keep them that way with some simple maintenance habits that take almost no extra effort.
Regular washing is your first line of defense. Every time you wash your car, give your headlights some attention too. A quick wipe-down prevents dirt, road salt, and grime from building up on the surface. Winter is especially tough on headlights here in Utah, with all that road salt and debris, so don’t skip this step during your regular car care routine.
When it comes to cleaning products, avoid harsh chemicals like the plague. Use a pH-neutral car soap—the same gentle stuff you use on your paint. Those heavy-duty degreasers and abrasive cleaners might seem like they’re doing a thorough job, but they’re actually breaking down your protective sealant layer. Stick with the mild stuff, and your sealant will thank you.
Even the best sealants don’t last forever. Depending on your product and how much sun exposure your car gets, you’ll want to reapply sealant every 6 to 12 months. Think of it like changing your oil—a little preventive maintenance now saves you from a much bigger job later. If you notice your headlights starting to look slightly dull, that’s your cue that it’s time for a fresh coat.
Finally, here’s the easiest tip of all: park in shade or a garage whenever you can. Every hour your car spends out of direct sunlight is an hour your headlights aren’t being bombarded by UV rays. We know it’s not always possible, but when you have the choice, take advantage of covered parking.
These simple habits take just minutes but can extend your restoration results by months or even years. And if you want professionals to handle all aspects of your vehicle’s appearance, including headlights, our team at Cleaner Bros offers comprehensive Exterior Detailing Utah services that come to you—no need to drive anywhere or wait at a shop.
DIY vs. Professional: Making the Right Choice
Deciding whether to tackle head light restoration yourself or hire a professional can be a tough call. Both options have their merits, and understanding the pros and cons of each approach helps you decide what’s best for your vehicle and budget.
Comparing Costs, Time, and Results

Let’s be honest: there’s something deeply satisfying about restoring your own headlights. You save money, learn a new skill, and get to admire your handiwork every time you walk to your car. Here’s a breakdown of how the two options compare:
| Feature | DIY Restoration | Professional Service |
|---|---|---|
| Cost | $15 – $50 | $75 – $150 |
| Time | 2 – 3 hours | 30 – 60 minutes |
| Results | 6-12+ months | 1-3 year warranty |
But here’s the reality: DIY restoration carries some risks. It’s possible to sand unevenly, leaving visible scratches or cloudy patches. You might accidentally sand through to the underlying layers if you’re too aggressive with coarse grit. And without proper masking, you could scratch your car’s paint—an expensive mistake that negates any savings.
Professional detailers eliminate these risks. They’ve restored hundreds (or thousands) of headlights and know exactly how much pressure to apply, which products work best, and how to achieve that factory-fresh clarity. The value of expert results isn’t just about appearance; it’s about knowing the job was done right the first time.
So which should you choose? If you’re handy, enjoy DIY projects, and have a weekend afternoon to spare, go for it! The satisfaction and cost savings make it worthwhile for many car owners. But if you’re short on time, nervous about making mistakes, or want guaranteed long-lasting results, professional service is the smarter investment.
At Cleaner Bros, we offer professional Mobile Car Detailing Utah services that include expert headlight restoration as part of our comprehensive detailing packages. We come to you, use premium products, and guarantee results that last.
When to Replace Instead of Restoring
Sometimes, restoration just isn’t the answer. While most cloudy, yellowed headlights respond beautifully to restoration, there are situations where replacement is the only safe and effective option.
Deep cracks or fractures in the lens mean it’s time for a new headlight assembly. These structural issues compromise the integrity of the headlight and can’t be fixed by sanding and polishing. Even small cracks can spread over time, especially with temperature changes, and they create weak points that could fail when you need your headlights most.
Internal condensation or moisture inside the headlight housing is another red flag. If you notice water droplets or fog inside the lens (not just on the outside), that means the seal has failed. No amount of external restoration will fix a broken seal. Moisture inside the housing can damage your bulbs, corrode electrical connections, and create a breeding ground for mold.
Severe physical damage—like impact damage from an accident, melted plastic from overheating, or chunks missing from the lens—also requires replacement. These aren’t surface issues that restoration can address. Trying to restore a severely damaged headlight is like putting a band-aid on a broken bone: it’s not going to work.
Here’s where cost-effectiveness comes into play. If a replacement headlight assembly for your vehicle costs $50-$100 and your headlights are severely damaged, replacement makes financial sense. But if you’re looking at $300-$500 for OEM (Original Equipment Manufacturer) headlight assemblies and your lenses just have surface oxidation, restoration is definitely the way to go.
When in doubt, ask a professional. The team at Cleaner Bros can assess your headlights during a Mobile Car Detailing Utah appointment and give you an honest recommendation about whether restoration or replacement is your best option. We’re not in the business of selling you services you don’t need—we want you safe on the road with headlights that actually work.